How To Start A Blog in Canada (2026 Guide)
Starting a blog is great way to make money from home, but most of the tutorials out there are targeted at people living in the USA.
This guide will show you how to start a blog in Canada in 2025 and why it is a bit different for us up here in the north.
I started this blog back in 2017 and my only regret is that I didn’t start it sooner!
If you are thinking of starting a blog, my advice is do it now!
It does take a little while to build traction so the earlier you get going, the better.
Blogging is a great way to make some extra money, make friends online and connect with people from all around the World.
It’s also the perfect side job for stay at home moms, university students and anyone with time on their hands at a computer.
This page contains affiliate links meaning I earn a commission if you use those links. Please read my disclosure for more details.
If you are wondering whether is is really possible to start a blog in Canada that makes money, the answer is yes!
I actually think blogging is one area where it might be easier to make it as a Canadian than an American!
The advantages of starting a blog in Canada
- You can target traffic from Canada, the USA and the rest of the World
- Most companies pay in USD so your bank account will be happy
- Same timezone as the USA which is a huge advantage
- Less competition for sponsored work than Americans face
- Tax deductions for home office expenses and other business costs
Do Canadian bloggers really make money?
While you may not care about making money with your blog, I am going to assume that you are visiting this site because it is something that interests you.
After all, if you are going to spend hours creating interesting content for your readers, why not get compensated?
So can you really start a blog that makes money? Should you?
Absolutely. Creating a blog that provides value to readers takes a lot of effort. So why shouldn’t you get paid for all your hard work?
I personally started my first blog with the sole intention of quitting my full-time gig.
My job was really stressful but our budget requires me to work.
I gave myself a goal of 6 months but in reality that was not enough time.
After 11 months of blogging, I ended quitting my job and becoming a full-time blogger which I think it pretty attainable if you are prepared to work hard and are motivated.
I am now almost 5 years into this blogging thing and I am now in a position where I can drop it for a week or so and not suffer any dire consequences.
This is in part thanks to automation tools that I use (see below for more details).
I typically work for 5-10 hours on my blog at the moment although it fluctuates throughout the year.
The amazing thing is, you really don’t have to a a big name blogger to make enough money to quit your job.
Here are 3 Canadian bloggers who make money with their blogs:
- Me! You can read some of my earlier blog income reports here.
- Carly from Mommy On Purpose makes over $20,000 per month.
How can you make money with your Canadian blog?
- Set your blog up correctly (see below for instructions!)
- Drive traffic to your site so that you can monetize it.
- Choose a subject that people want to read about
About that third point; any subject (or most) can attract readers as long as you are providing them with a solution to a problem.
Let’s all be honest though, there are certain niches that have more of a chance of making money than others.
Make sure you choose a topic that appeals to a large amount of people.
There is nothing wrong with going “niche” but don’t be so narrow that only 5 people in Canada would read your blog!
For example:
Good Broad Niche – Cottaging in the Muskokas
Too Niched down – Life on Bass Lake, Muskoka
The best niches for starting a blog that makes money
According to The Blogging Millionaire survey, the most popular niches that make the most money are the following:
Food
On my other blog, I’m a member of an ad network which is mainly for food bloggers so I’ve had a chance to see some of the most popular food bloggers out there.
How they monetize their blogs: ads, sponsorships, cookbooks
Personal Finance
Many personal finance bloggers are able to make a full-time living talking about frugal living, homesteading or giving advice on paying off student loans and budgeting.
How they monetize their blogs: ads, affiliates
Liftestyle/Mommy Blogger
These bloggers talk about all different things from home decor, fashion and recipes.
How they monetize their blogs: ads, affiliates
Steps to Creating A Blog That Makes Money
- Start your blog – hosting
- Choose a domain name for your blog
- Pick a WordPress theme
- Install plugins
- Create the necessary pages
- Start writing!
- Promote, promote, promote!
- Join an ad network
- Start making money with sponsored posts and affiliate marketing
How to Start a Blog in Canada in just a few minutes
Now you have chosen a niche (or two), it’s time to actually get your blog up and running.
I would say that you can probably do this over a weekend and be ready to launch your blog within a day or so.
Even if you are not techy, it is pretty easy to start your blog quickly.
Don’t get overwhelmed with the little details at this stage in the game, follow the below step by step and you will be ready to launch in just a few hours.
10 Steps to starting a blog
- Choose a catchy, original name for your blog
- Buy hosting
- Install WordPress
- Pick the best theme for your topic and audience
- Install essential plugins
- Create your privacy policy, about page and contact information
- Start writing blog posts
- Promote your blog
- Put ads on your site
- Start affiliate marketing and joining influencer networks
First of all, I recommend starting with a self-hosted site using WordPress.org.
While it is possible to start a blog for free on WordPress.com or Blogger, if you plan to monetize your blog and make an income from affiliate marketing and ads, then it is worth the small investment to have a self-hosted blog with your own URL.
Self-hosted blogs use WordPress.org (not.com) and you will be able to install it right from your host.
Don’t worry about this for now as your host will literally point you in the right direction once you have set up your hosting.
1. Finding the perfect blog name
This is not as easy as it sounds as many of the names you think of will already be taken.
Some ideas to help your creativity:
- Use your own name or a version of it
- Play around on Wordoid and see what it comes up with.
You can check if your desired URL is taken directly at your host, for example Bluehost allows you to check for domain availability before you buy hosting.
Don’t forget that you can buy a URL that is not .com but .com sites are still the gold standard online.
Here are a few tips for picking a blog name:
- Don’t use your first name. I see a lot of people regret this later on.
- If you have a blog URL with your niche in it, it may help your Google rankings.
- Keep that in mind though, in case you decide to switch niches later on.
Once you have chosen your URL, you can go ahead and register it with your chosen host or a site like Namecheap.
2. Get hosting for your site
Once you have registered your domain , it is time to choose a website host.
A host is basically the garage where you park your car (website).
The host you choose is important because your site speed and reliability will all depend on your hosting company.
You also want to make sure their customer support is good in case you experience any problems with your site.
Sometimes sites go down or crash because of too much traffic or a plugin issue (we will get to those!) and you need your host to act quickly to get you back up and running.
If you are a new blogger, I highly recommend Bluehost.
I have used them on several sites and am very happy with the service so far. I’ve contacted customer service via chat a few times and been connected within seconds and my problem has always been resolved.
If you are not sure how blogging will go and are on a tight budget, Bluehost is perfect.
Bluehost includes some extras that other hosting companies charge for which is why I recommend them for newbies.
Included With Bluehost Hosting
- Free Domain Name
- WordPress.org for free
- 24/7 support (phone or chat)
- 30 days money back guarantee
- Self-hosted blog for less than $80 a year which means you can monetize your blog using affiliate links and ads
Bluehost also offers FREE SSL certificates for all WordPress sites which is amazing.
I was charged $100 just for 1 year of SSL with my previous host so you can see that Bluehost really provides value.
An SSL certificate gives your site the padlock sign in the browser bar and is a must.
I highly recommend starting your blog with the SSL installed to avoid having to do redirects at a later date.
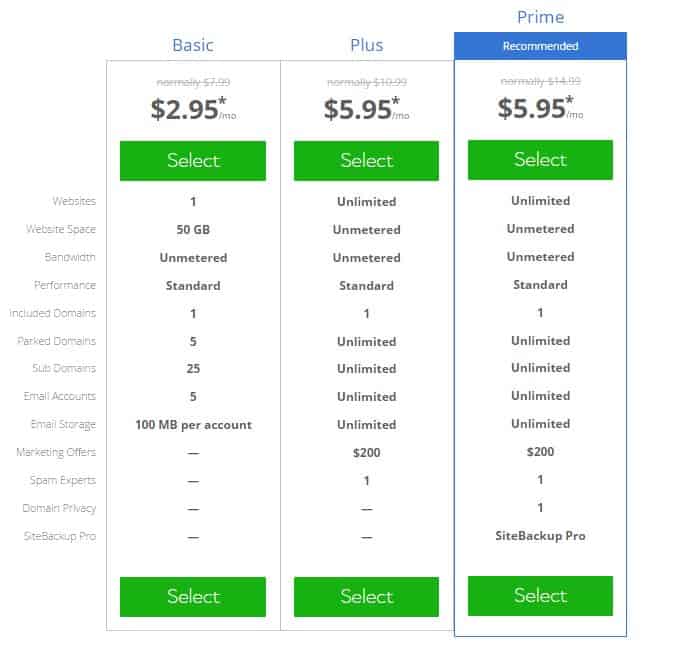
Bluehost has 3 plans to choose from depending on the traffic you get on your site.
You can just get the Basic one when you are just starting out. You can always upgrade your plan if your traffic grows quickly.
Also don’t buy any extras that they offer unless you want the Domain Privacy Protection for an extra $0.99 a month (this means no one can find your address through your domain).
Check out all the Bluehost Plans Here
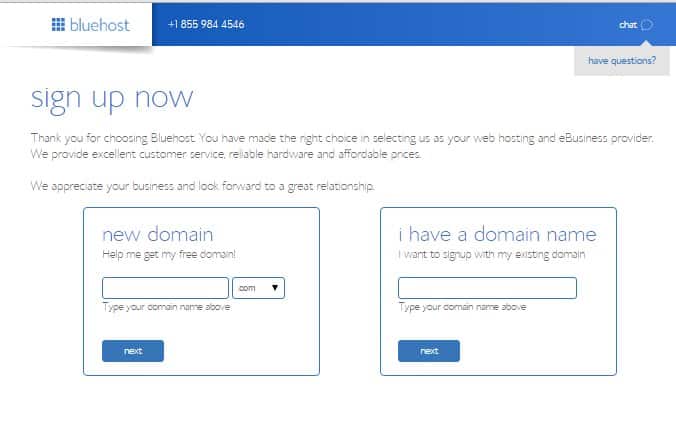
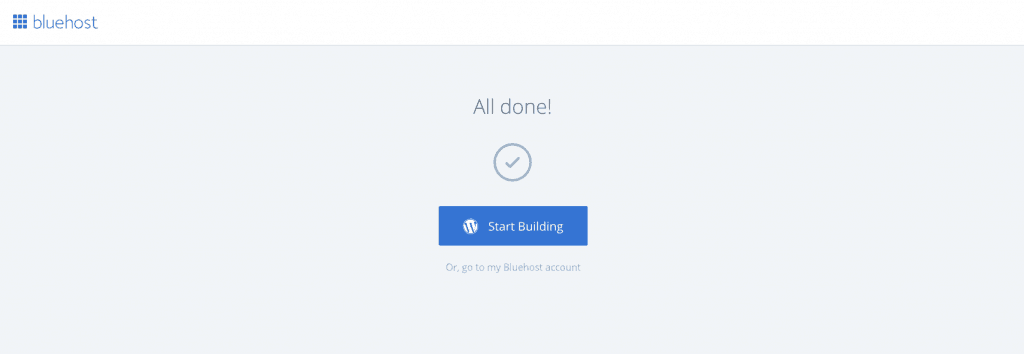
Once you are ready to begin setting up your blog, you can click-through to Bluehost and get started!
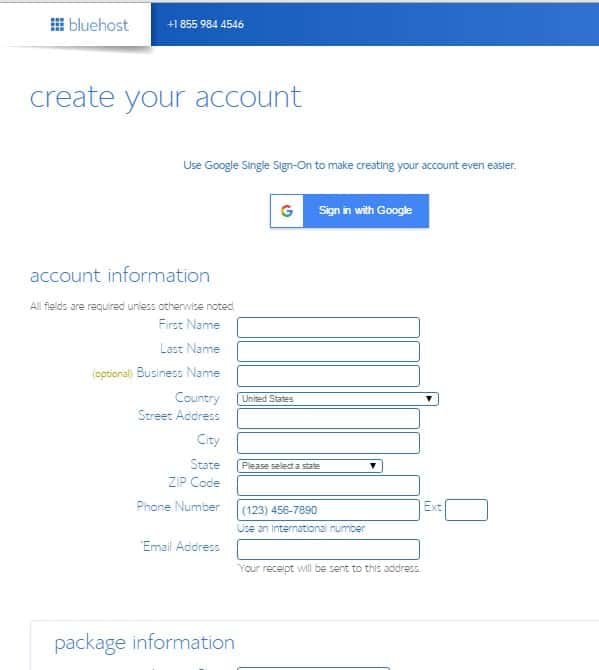
The first page you will get to is the domain registration. Enter your chosen name in the “new domain” box and click next.
Create your account
You will be instructed to create your account, choose your package and enter your payment details.
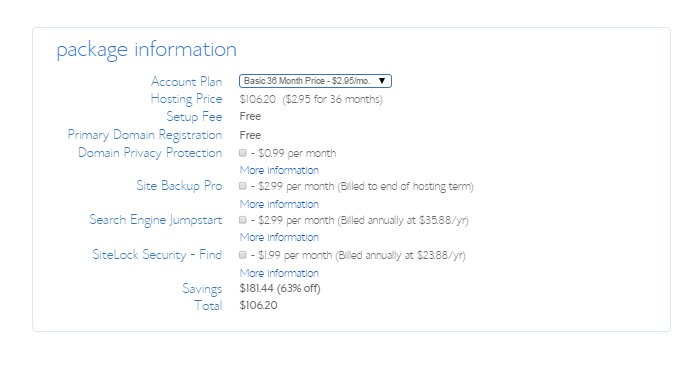
I signed up for the longest term possible as that is always the cheapest option.
Don’t forget there is a 30 day money back guarantee if you decide blogging isn’t for you in your first month.
Using this link, you can get your hosting for $2.95 a month for 36 months or 60 months.
That will cost you a smidge over $100 for 1.5 years of hosting which is an awesome deal.
The reason I recommend the longer term is because the prices for hosting always go up after the first term so the longer you can stretch it out the better!
As I mentioned before, you don’t need any of the extras mentioned in the package part so you can go ahead and uncheck them.
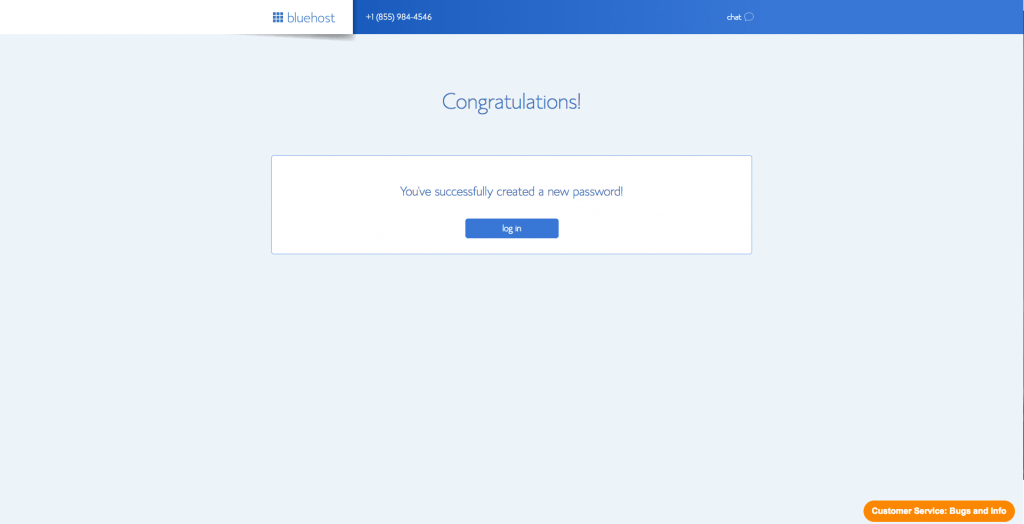
Next, create your account and choose your password and you are done!

3. How to set up WordPress.org
WordPress is where you will write your blog posts and make everything look pretty.
- Once your account has been set up with Bluehost, you will be in your account dashboard. Click the “install WordPress” button at the bottom of the screen to start the process. You might also be immediately redirected to this button.
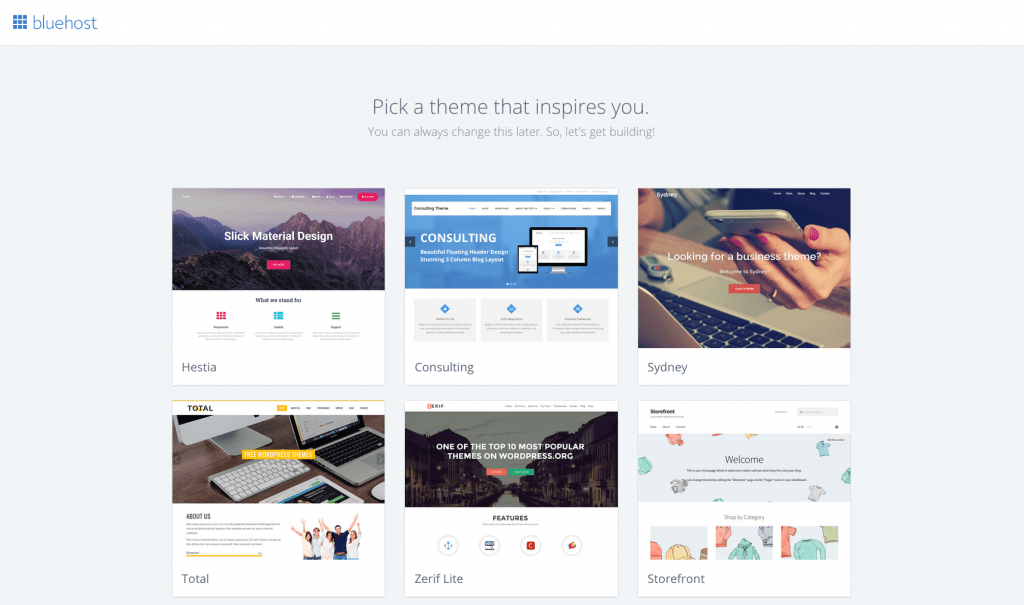
- Don’t worry too much about the theme right now but you can go ahead and pick a free one just to get your started.
- Click ” Install” on the pop-up
- Create a username and account name and click “install now”
- You will now receive an email from Mojo Marketplace with your WordPress.org login details. Keep it somewhere safe.
- You are all set! Time to do the fun stuff and make your blog pretty!
This is what your WordPress dashboard will look like. Along the left hand side, you can choose to start a new post or page, add media (images or videos), customize the appearance of your blog (colors and fonts) and add plugins.

6. Setting up your blog
Once you have logged into your WordPress site, head to Users on the left hand side menu and click on “all users”. You should see your username (as per the email from HostPapa) there and you can click on the username to change your password.
You can also choose the colours you want for your WordPress backend and the name to be displayed on your posts (make sure this is not the same name as your username for security reasons).
7. Choosing A Blog Theme
Now we get to the fun stuff! Go to Appearance > Themes on the menu and you will see some free WordPress Themes already loaded onto your site.
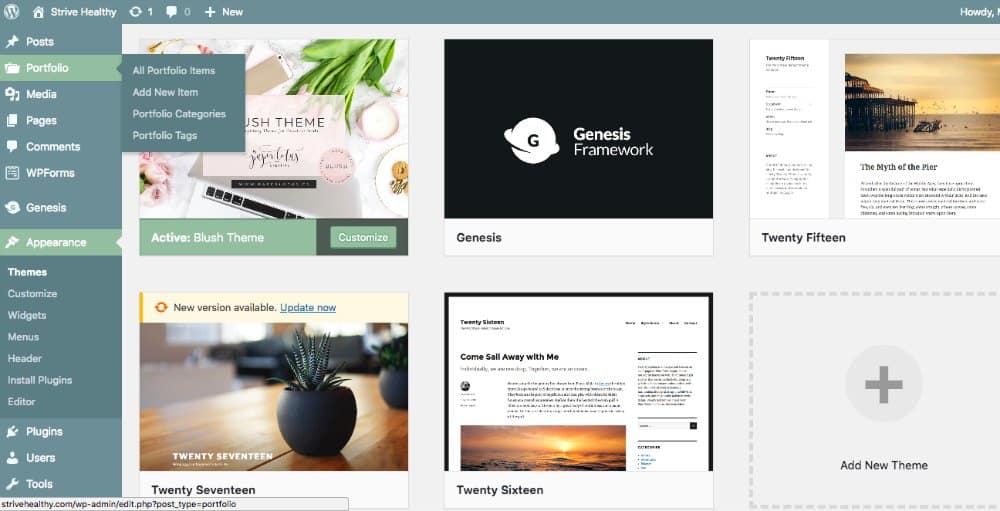
You can choose any of those or any free WordPress themes you find online (a google search will bring a bunch up).
Bear in mind that premium themes that allow you to customize everything will cost a bit but they shouldn’t be more than $50 including a Genesis Framework.
As you can see above, for my site, I am using the Blush theme Paper Lotus.
I bought it from Creative Market which is a great source of good themes for all different types of blogs.
Also, if you sign up for Creative Market’s newsletter, you will get 6 free items form them each week, every week it is something different – images, fonts, media kits etc. It’s one of my favourite freebies for bloggers.
I highly recommend getting a Genesis theme for your blog. I only use Genesis as they come with some great plugins and are very user friendly.
Don’t buy a theme that makes you pay extra for Genesis though, unless you absolutely LOVE it.
All the themes I have bought come with Genesis included for the same price.
Once you have chosen and downloaded your theme to your computer, just click on “add new” and upload the zip file to your WordPress. Then follow the theme’s instructions to set it up.
Once it is all set up you can mess about and change fonts, colors and add your logo to the header.
8. Add Plugins
Most themes will come with a list of “recommended plugins” so you can follow that as much as you like.
I normally ignore it except for the ones that I actually need to make the theme look as it should.
In general, the less plugins you have, the better, as they can slow down your site and also if they break, they will break your site (my site has crashed twice and both times were due to plugin updates).
I do have a list of my must-have plugins that I recommend (they are all free although some marked with a *, have a premium plan too (I do not pay for the premium versions).
Akismet Anti-Spam – Filters spam comments
Grow.me by Mediavine- The share buttons at the bottom of my posts. You can use a fancier plugin and I have paid for premium ones that are prettier but I find this one is light and fast and does the job.
The GDPR Framework – Creates a Privacy Policy for your site and also helps you become GDPR compliant.
Yoast SEO* – Helps you improve your search engine rankings and also gives you the option to create add a specific description and image for Facebook sharing.
Wordfence Security* – Firewall and protection for your site from bots and hackers.
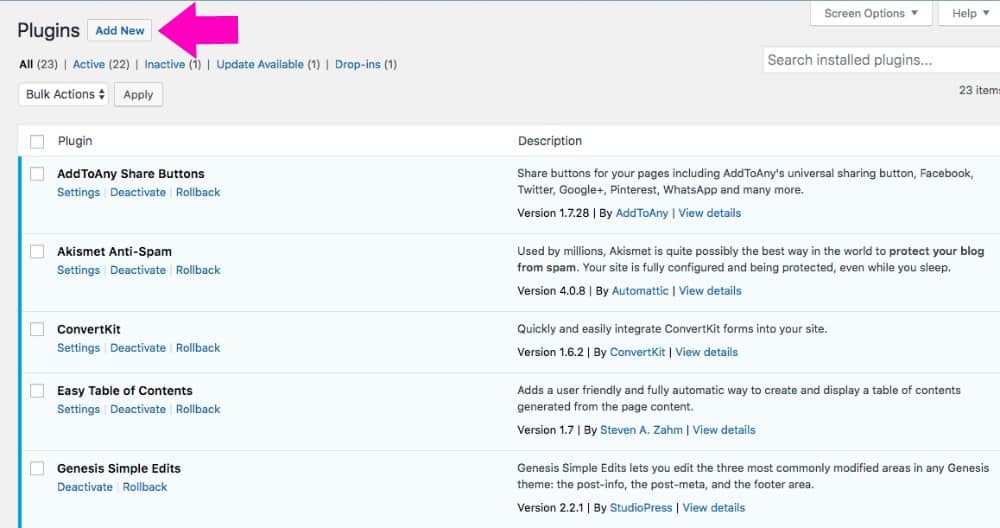
To add a new plugin, just go to the Plugin tab and click “add new” search for the one you want and then once it is installed click “activate” and set it up as prompted.
9. Add Essential Pages To Your Blog
There are a few pages that you need on your blog, either for legal reasons or just because it makes sense.
Of course, you can combine your pages or add footnotes instead but in general, you are going to need the following:
About Page
Tell your readers more about you and what your goal for the blog is.
Tell them why you started the blog and any relevant background that makes you an “expert” in your field.
For example: If your blog is about getting out of debt, tell them your personal story of becoming financially independent.
You can also use the About me page as a contact page or you can create a separate “contact me” page.
Privacy Policy
With the new rules from the EU, your blog must be GDPR compliant. And, if you plan on making money, you won’t get into an ad network and can be rejected by affiliate programs without one.
My ad company, Mediavine, specifically insists on checking for a GDPR compliant privacy policy before they accept you.
TIP: Use the GDPR Framework plugin mentioned above to generate a GDPR compliant privacy policy in seconds. Then all you have to do is fill in the blanks where indicated and make sure it is all correct.
Link to the privacy policy in your footer (you will usually do this under widgets depending on your theme set-up).
Disclosure Policy
If you plan on making money on your site, you need this too. This is where you disclose that you use affiliate links on your blog and give details on what that means for your readers.
If you are a member of Amazon Associates, you will need to have their exact wording requirements on your blog, both in the disclosure page and in a footer.
Every post on your blog should have a disclosure that explains that you use affiliate links with a link to your disclosure page for more information.
This is a strict rule from the FTC in the USA. You can see mine at the top of this page.
What about affiliate disclosures for Canadians?
One of the biggest issues when you start a blog in Canada is the lack of information available.
For example, Canada doesn’t give exact guidelines like the FTC gives in the US .
As you will likely be getting some traffic spillover from the USA, it’s wise to use their guidelines which you can find here. That way you are covered for sure.
If you don’t want to write out the affiliate disclosure on every single blog post, there are plugins that will do it for you.
Personally I don’t use one because as I mentioned before, less is more when it comes to plugins and a quick copy and paste does the trick.
10. Start Writing Amazing Content
Now your blog is all set-up, it is time to start putting some posts up. Simple go to “add new” under Posts on the menu and you will be all set to start writing.
I do recommend you either backup your blog using a plugin such as Updraft or write your posts on Google Drive and then copy them to WordPress.
How often should I post to my blog?
You don’t need a blog schedule or editorial calendar but it’s wise to blog frequently in the beginning so you can create a library of content.
I started off publishing posts about 3 times a week and gradually cut it down to twice a week once I had around 100 posts.
What images should I add?
Use photos to illustrate your points and break up long walls of text.
Make sure to include images for sharing on Pinterest, Facebook and Twitter.
I use the free Canva program to create my images and they have a standard “pin” size for Pinterest.
Be mindful that most themes have a “featured image” which is the one they show on the home page in snippets.
Check with your theme for the correct size for this image, on my blog, the size is 500 x 500 and it shows up as a small square on the side of the text when you look on my home page.
If you want to use stock photos, use this 26 sites that offer free stock images to get started for free.
How many posts should I have before I launch my blog?
Aim for 10-20 blog posts before going live to give your blog some credibility, make sure to interlink each post to others on your blog so that your readers will stay on your site longer.
You can add related posts in your side bar using a widget or just link to them in your post like I do here:
More Blogging Tips For Beginners
FREE Course – Blogging For Canadians
11. How to promote your blog
One of the weirdest things about starting my blog was that I wrote some posts, spent hours on the design and then just expected people to find me.
Unfortunately it doesn’t work like that for new blogs and unless you have a huge following or your mom really likes checking out your blog every day, you won’t get the page views you want without promoting heavily.
The 80/20 rule has never been truer than for blogging – 20% of your time should be for creating content and 80% should be for promotion.
There are lots of places to promote your blog for free and it can get a bit overwhelming to be honest. I highly recommend picking a few platforms to start with and really perfecting them.
Pinterest is the quickest was to get traffic to a new blog and for that I recommend you use Tailwind.
It’s a scheduling tool that lets you automate Pinterest so you can focus on other things. Get a free trial of Tailwind here.
To learn how I use Tailwind, here are some tutorials I put together:
How To Loop Pins Using Tailwind (in just 15 minutes a month)
How to use Tailwind Communities to boost your blog traffic
Another tip I have for you to is put a Copyright/Sharing policy which can help you get more traffic.
The Best Blog Courses For Beginners
You can also buy some blogging courses (and believe me, in my first year of blogging, I bought a ton!)
Out of the probably 15-20 blogging courses I have bought, here are my favourites for teaching you about blog traffic.
My advice is not to spend a ton of money when you are first starting out. There are courses that cost $500+ but I have never bought them and have done fine.
With all the prices in USD and the Canadian dollar not at it strongest, it’s worth finding freebies wherever you can.
Here are my top choices for new bloggers who want to start a blog in Canada:
Pinteresting Strategies
This course is written by one of the most successful Canadian bloggers. It will help you to grow your Pinterest traffic quickly through manual pinning.
Carly grew her Pinterest referrals from 0-200K page views in 6 months using these techniques.
FREE Blog Traffic Bonus Guide
Free course by Lena Gott who grew her traffic from 30,000 to 400,000 page views in only 10 months. I highly recommend every new blogger downloads this completely free guide.
FREE guide to creating pins that get noticed
Download my free guide to creating pins for Pinterest that will help you get started quickly (and avoid the mistakes I made – download the book to see some of my awful pins).
Journey To The Centre Of Amazon
Debbie, the author of this book made over $200,000 in affiliate income in 2021! She routinely makes $5-10,000 a month with Amazon associates and this ebook will show you how.
Its a must-read if you want to really hit the ground running with affiliate marketing.
Here is a complete list of my favorite blogging tools and resources.
9. Should you put ads on your site?
If you want to start a blog that makes money quickly, you probably want to put some ads on your site.
In the beginning, your choice is really limited to Google Adsense.
You can apply as soon as your blog is live and it can take about a month to get set up.
Another option for new bloggers is Ezoic.
I actually have Ezoic on one of my blogs and it definitely makes more money than Google Adsense but it is a bit more complicated to set up.
You can check out Ezoic and sign up here.
Once you reach 50,000 sessions in 30 days, apply for Mediavine or wait until you hit 100,000 page views and join Adthrive.
These are ad networks that pay much, much better than Adsense (With Mediavine, I earn in a day what I earned in 3 months with Adsense).
10. Get Started With Affiliate Marketing
If you really want to start a blog in Canada and make money, then you need to start affiliate marketing.
Affiliate marketing is good for recommending products to your readers.
Affiliate links are referral links that pay you a portion of the sale made by your reader when they click your links.
I recommend signing up for affiliate programs as soon as you start your blog.
This post gives you a great list of the top affiliate networks that accept new Canadian bloggers plus more advice for getting started with affiliate marketing.
All of them accept Canadian Bloggers and most of them pay in USD so it is a win-win situation for us Canucks.
How do the affiliate networks pay Canadians?
One of the biggest headaches for Canadian bloggers is getting hit with huge exchange rates and wire fees just for earning money!
It really sucks but on the other hand, it is pretty sweet to get paid in USD and see the awesome exchange rate.
The largest networks I use, shareasale.com and Impact Radius, pay me directly into my Canadian bank account in CAD. I don’t have to pay any fees which is great.
For the networks that do not pay directly into my bank via ACH (same as an interac transfer), I use Payoneer.
Payoneer is pretty awesome as it provides me with a free US bank account that I can use just as though I were an American.
I use it mainly for Amazon Associates US site as they will not pay via PayPal and cheques take too long.
I do use PayPal for some of the smaller affiliates I promote and it works just fine, however sometimes I get charged a fee for receiving money which is annoying.
If you have join programs that pay by cheque in USD, don’t worry – you can pay it right into your Canadian chequing account at your bank (no fees).
11. Using Amazon’s OneLink
Whether the majority of your traffic is from Canada or somewhere else, I highly encourage you to sign up for the Amazon One Link program.
OneLink will direct your readers to the appropriate Amazon store for their country and give you credit. You only need to choose one link to put on your site (eg from Amazon.com) and Amazon will take care of the rest.
I find this invaluable for Canadians who often get a mix of Canadian and US traffic to their sites.
12. Build up your social media following
Lastly, one of the best ways to make money with your blog is through sponsored posts for brands. The main social networks that brands want to see are Instagram, Twitter and Facebook.
If it all feels like too much work, don’t forget that you can automate your social media. This means that my posts go out automatically without me having to be online.
I use the following automation programs (all free):
- Hootsuite – Twitter
- IFTTT – Everything! I set it up so anything I post on Facebook automatically hits my Twitter feed.
- Facebook and Instagram – I use Facebook’s own scheduling tool.
If you have enough traffic to your site, you can often get sponsored blog posts too which pay anywhere from $200-700 USD per post depending on the brand and your pageviews.
To land sponsored posts, you can either reach out to brands directly or join influencer networks. The networks are a great place to start looking for sponsored work.
What To Read Next
How Tailwind Communities Helped Me Grow My Blog Traffic
9 Simple Ways To Improve Your Pinterest Game Quickly


What’s the difference after all in starting a blog in Canada or somewhere else in the world? You just need a server and a hosting plan and a CMS, and you’re good to go. That’s all!
Hi,
When do you register your blog as a business? Is there any information you were able to find regarding this information?
Thanks
Hi Kien, It’s really up to you. I did register my business as it is super easy to do online (costs around $60 here in ON). I would definitely consult with an accountant regarding HST etc as that depends on whether you are selling services/products in Canada to Canadians.
Thank you!! This helped me get started. Very easy to follow and the suggested sites were perfect for what I wanted.
Thanks for the feedback Dawn and good luck with your blog!
Great post thanks for sharing and useful information.
The link to host papa is in American dollars? I’m confused as you mentioned it’s all Canadian.
Weird, when I go on it, it’s in CAD. If you scroll to the bottom, you can choose your country and currency though. I know they do sell Worldwide in different currencies so maybe their geo tracking thing is wrong!
Great post. Thanks for sharing. You cal also share your blogging ideas for free on echofavor dot com
Great post. After reading the blog i can sort out my lots of queries.